Showing posts with label Easter. Show all posts

Tuesday, December 8, 2020

Granini's Cookies


Granini's Cookies


Every year I keep posting cookie recipes, but then I can't remember which recipes I still need to add to my blog. Here is a lovely collection of cookie recipes that I've posted so far... I will endeavor to remember to post the missing recipes as this month flies by!

Chocolate Chip Cookies
Chocolate Cookies with Peanut Butter Chips
Chocolate Cookies with Andes Mint Chips
Cinnamon Sugar Cookies
Cinnamon Sugar Cookies with Caramel filling
Gingerbread Houses
Gingersnaps
Lemon Crinkle Cookies
Linzer Cookies with Raspberry Cookies
Oatmeal Scotchies
Oreo Cakeballs
Peanut Butter Cookies with Reese's Peanut Butter Cups
Pecan Tassies
Pina Colada Cookies
Raspberry Thumbprint Cookies
Sand Tarts
Shortbread Sugar Cookies with frosting
Snowballs (Mexican Wedding Cakes)
Sugar Cookies
Snickerdoodles (Cookies made from leftover Pie Crust)


Gingersnaps


      Raspberry Thumbprint Cookies


Shortbread Sugar Cookies
(Great for frosting / decorating)

Snickerdoodles recipe & instructions


* * * * *

Here are links to her other desserts:


* * * * *

I not only bake and cook, I write murder mysteries too!

Both books are available in paperback and kindle versions

Diamonds for Diamond 
(Book 1 in the Jack Diamond Mystery series)
and
No One Noticed
(Book 2 in the Jack Diamond Mystery Series)

Friday, June 26, 2020

Granini's Cheesecake Stuffed Cinnamon Rolls


Granini's Cheesecake Stuffed Cinnamon Rolls

For a decadent breakfast treat!

Ingredients:

Bread Dough:

1 package yeast (2 1/4 teaspoons)
1/4 cup warm water
1 cup scalded milk
2 Tablespoons shortening
2 Tablespoons sugar
1 teaspoon salt
1 egg, beaten
3 1/4 cups flour

Cinnamon Roll filling
2 Tablespoons butter, melted
¼ cup brown sugar
then
½ cup butter, softened
½ cup brown sugar
¼ cup sugar
1 cup raisins
1 cup toasted pecans

Cheesecake:
1 cube of cream cheese (8 oz), softened
2 Tablespoons butter
1 egg
2 cups powdered sugar (less if you prefer it slightly less sweet), sifted
¼ teaspoon salt
1 teaspoon vanilla
dash of cinnamon

Glaze:
 ¼ cup of the mixture above
3 Tablespoons half & half or heavy cream

Directions:
  1. Soften the yeast in the warm water.
  2. To scald the milk: place milk in a reactive saucepan on medium high.  Allow the milk to come to a full simmer.  When the milk starts to climb the sides of the pan, pull it off the heat.
  3. Add shortening to the very hot milk.  Allow milk to cool for about 10 to 15 minutes. (I generally put mine in the fridge to cool.)
  4. In a large mixing bowl, beat an egg.  
  5. Slowly add in the sugar, salt and 1/2 cup of the flour.  Slowly pour in the cooled milk, and mix in the remaining flour.
  6. Knead the dough for roughly 5 minutes.
  7. Lightly spray a clean, large mixing bowl with cooking spray.  Plunk your bread dough into the bowl, and cover with plastic wrap.  Allow to double.  
  8. Lightly spray 9x13 pan with cooking spray. Pour 2 Tablespoons of melted butter onto the bottom of the pan. Sprinkle ¼ cup of brown sugar over the entire bottom, creating a delicious base for your cinnamon rolls.
  9. Lightly flour your counter.  Roll the dough out into a large rectangle. Smear the entire surface with softened butter. Sprinkle brown sugar and white sugar over the entire surface. Sprinkle raisins and nuts over the top.
  10. Cut the dough into 9 even (approximately) squares.
  11. Carefully fold each section like an envelope so that each section has the sugar stuffing goodness tucked neatly inside. (See pictures below). I take two of the corners and pinch them together. Then I pinch the connecting sides together. Then I take the next corner, pinch it to the middle, and then pinch that side together. Then lastly I fold the top of the 'envelop' down, and pinch the last two sides together.
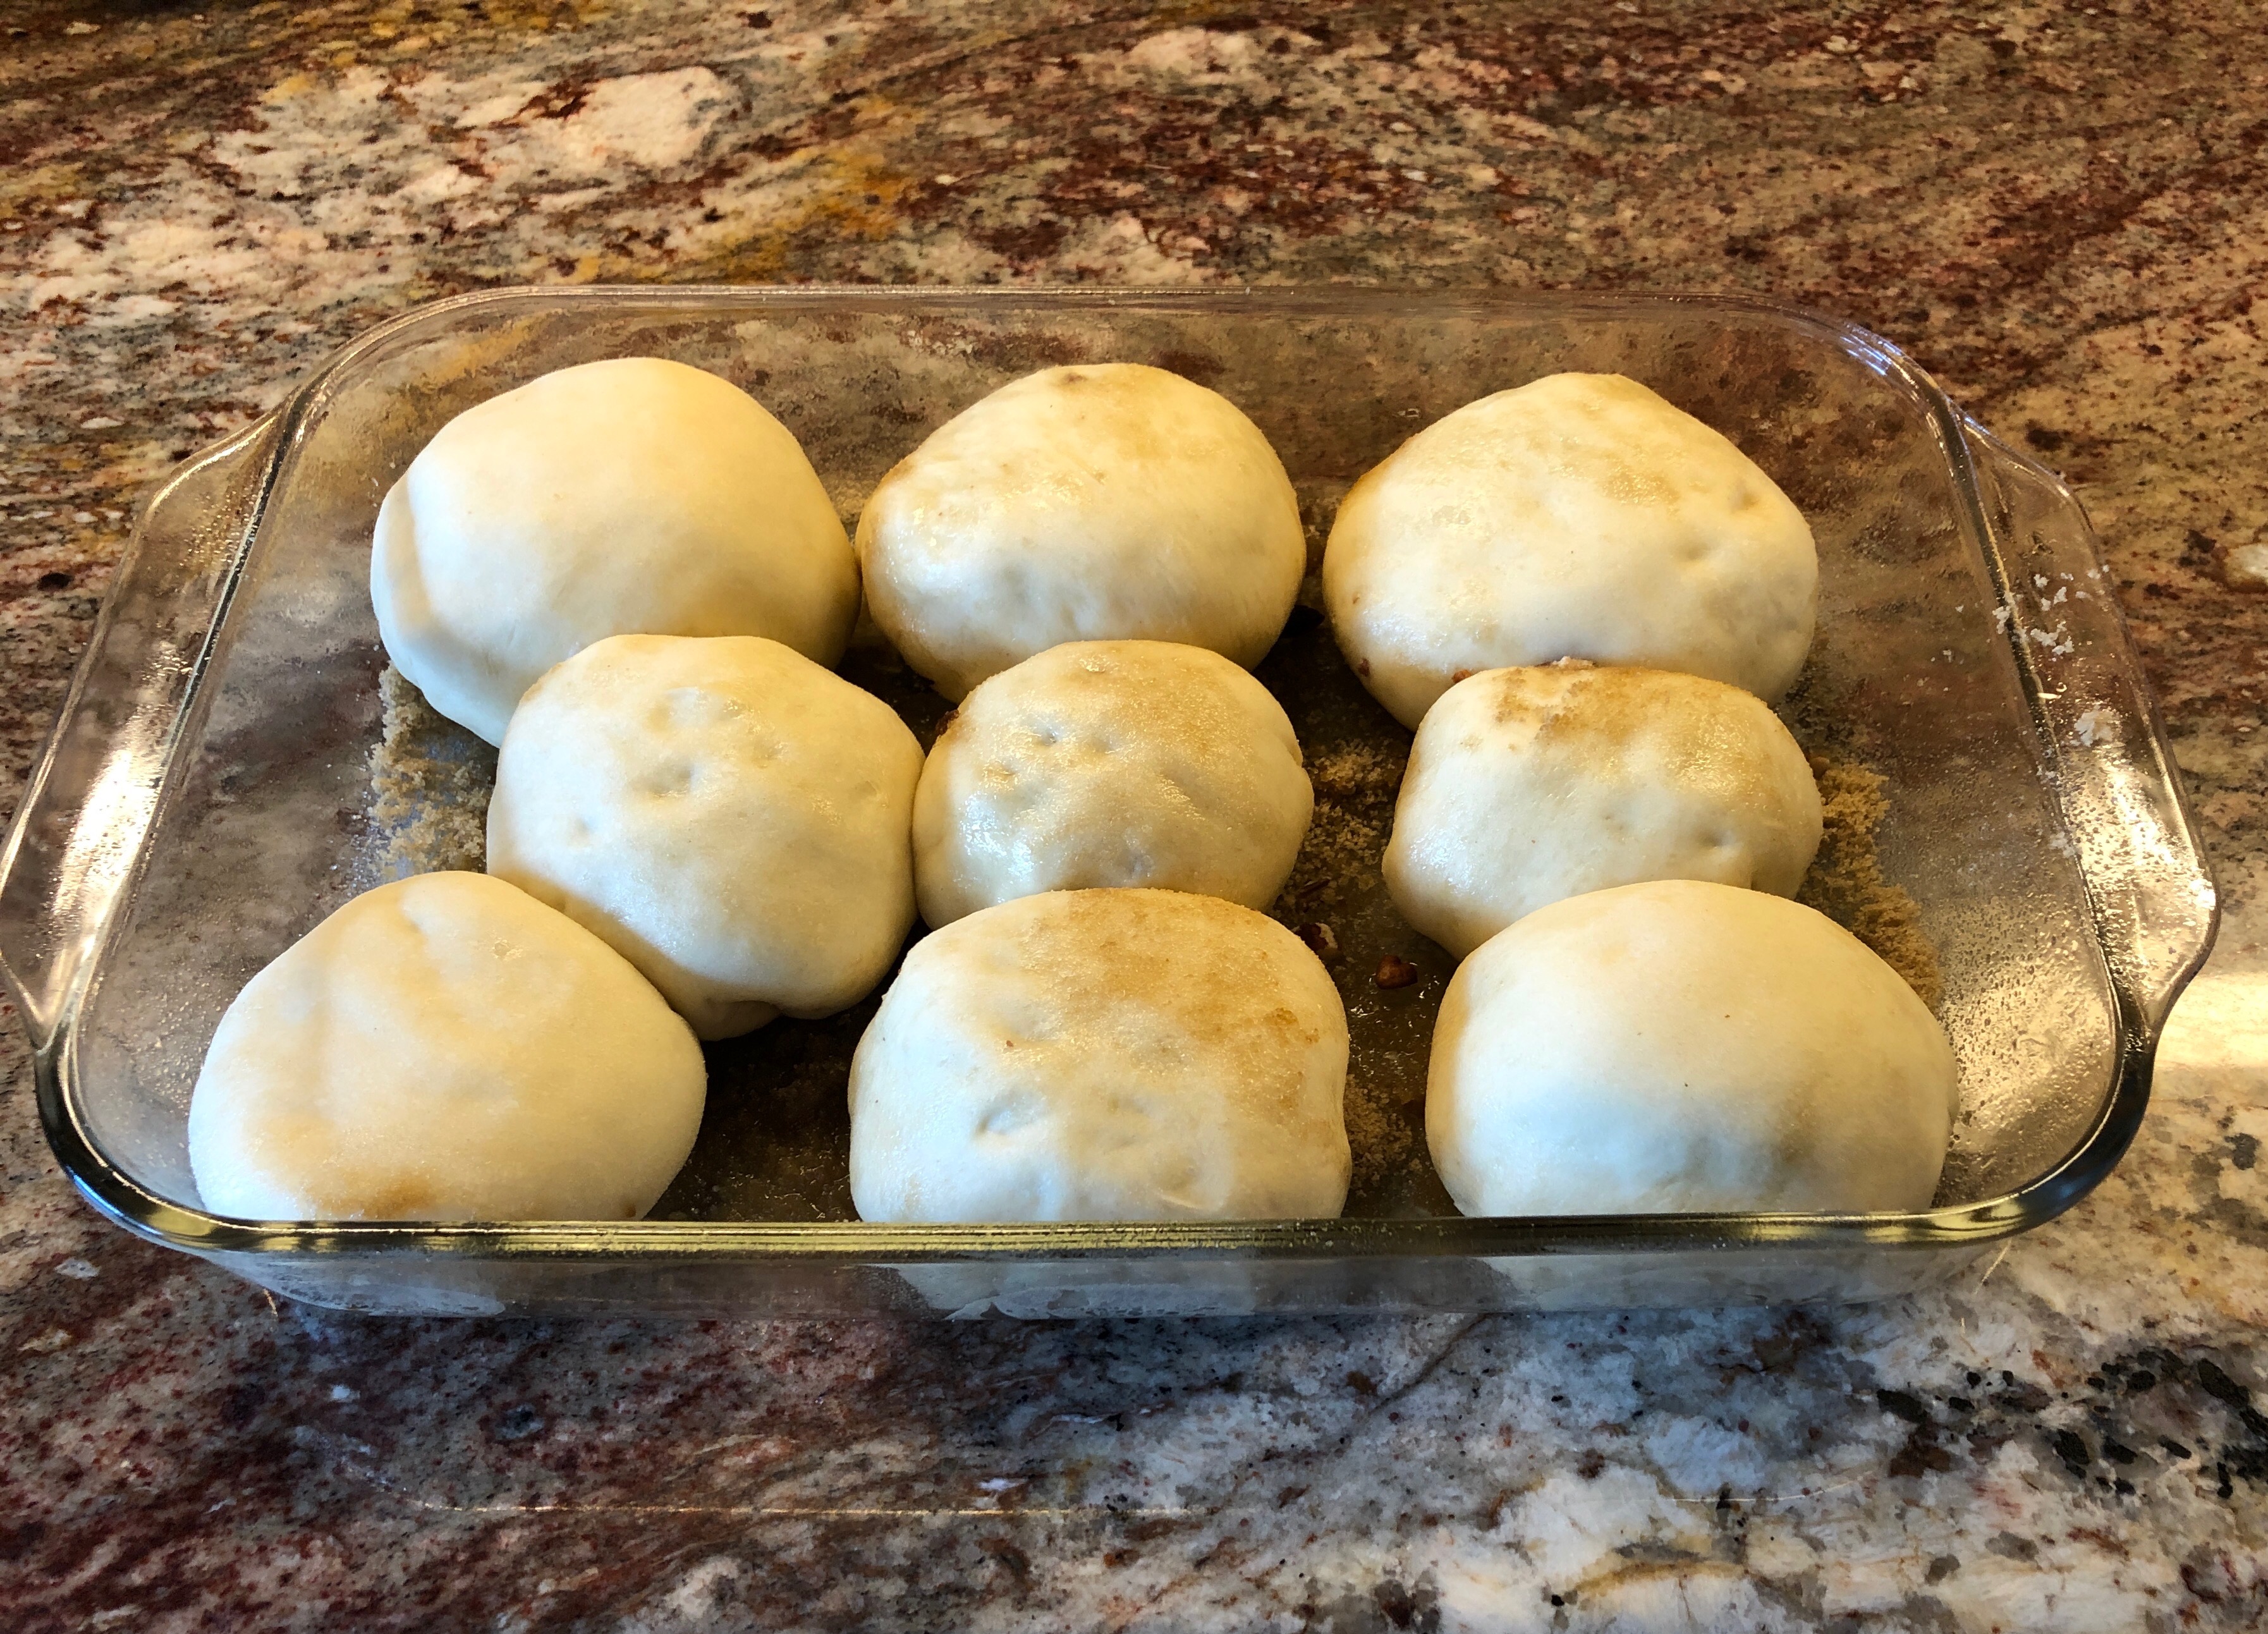
  12. Once your pocket is fully formed, plump it slightly into a ball, and place it seam side down onto your prepared 9x13 pan.
  13. Repeat with the remaining 8 pieces of dough, spacing the balls relatively evenly inside your dish.
  14. Allow the dough to rest and rise for 30 minutes. While the dough is resting, prepare your cheesecake batter.
  15. In a mixing bowl, cream the cream cheese and butter together until light and fluffy.
  16. Add in the egg, and mix thoroughly.
  17. Sift your powdered sugar with the salt and cinnamon and add it in slowly to your mixer.
  18. Add in the vanilla. If the mixture is extremely thick, add in 1 teaspoon of half & half, milk, or cream and blend until smooth.
  19. Take out ¼ cup of the mixture and set aside.
  20. Once your dough has risen for 1/2 an hour, with a clean, dry spoon, carefully make a divot into each of the cinnamon roll balls.
  21. With a large spoon, plop a nice sized blop of cheesecake filling into each divot.
  22. Bake at 375˚ for 20-25 minutes or so, or until lightly golden brown.
  23. Prepare your glaze.
  24. In a small mixing bowl, take ¼ cup of the cheesecake batter, add a dash of cinnamon, and 3 Tablespoons of half & half. Stir until the mixture is very smooth and light. It should cover the back of a spoon. Add more half & half as needed to make it not too thick.
  25. When the buns come out of the oven, take a pastry brush and paint the tops of all the rolls with the glaze.
  26. Serve while warm. 
  27. Try not to eat all of them, all by yourself, in one setting. If you do ever happen to have any leftover, which has happened, I think, maybe, just once, they are quite tasty and delicious the next morning for breakfast. Serve them either room temperature or warmed slightly in the microwave with a little bowl of fresh berries.  Or just by themselves. Naked. The rolls, not you.  Just sayin'.

For those of you who like pictures with your instructions, here you go!


Cut your dough into 9 pieces and then fold like envelopes, so that all the goodness is on the inside.

Take the two bottom corners, bring them up, and pinch together. 
Then pinch together the seam.

Pull down the next corner and pinch it into the first two corners.
Pinch the seam together.

Make sure everything is pinched together nicely.

It's ready for the last corner to come down like an envelope lid.

Flip the last corner down to the center. Pinch it in with the other three corners.
Then pinch together the two sides.

Everything is pinched together now!

 So then flip the whole thing upside down (seam side down), and kind of shape the whole thing into a ball.

The stuffed ball.

Place the ball into the pan with the rest of the stuffed balls. Don't worry if some are slightly smaller than others. Put the smaller ones in toward the center of the pan. 
Let them rise for about ½ an hour.

They have risen a wee bit, and are ready to put a divot into the top.

Fill each of the divots with the cheesecake filling.

Bake for 20-25 minutes, or until golden brown. (These are a wee bit more done than I normally like them, but the glaze will prevent them from being too crunchy.)

Cover with the glaze, and serve while hot.

Oh my goodness, just look at all that tasty stuff oozing out from inside!

Ooooooooh.

Yummmmmmmm!


* * * * *

I not only bake and cook, I write murder mysteries too!

Both books are available in paperback and kindle versions

Diamonds for Diamond 
(Book 1 in the Jack Diamond Mystery series)
and
No One Noticed
(Book 2 in the Jack Diamond Mystery Series)


Tuesday, April 21, 2020

Granini's Monkey Bread - the cinnamon kind

Granini's Monkey Bread


Much better!!

The first time I made monkey bread, it was a complete disaster. The biscuit dough was too mealy. The dough didn't cook all the way through. I filled the pan way too full. The syrupy goodness dripped down into the au gratin potatoes that were baking on the shelf beneath the monkey bread. The bread was way too salty, and no one liked it. Super duper sad.

So, I took what I learned, and WOW, what a difference!

This time I used my dinner roll recipe for the dough, used half unsalted and half salted butter for the caramel sauce, and mmmmm boy howdy it was delicious!!

So here you go!


Ingredients:
For the dough:

1 package yeast (2 1/4 teaspoons)
1/4 cup warm water
1 cup scalded milk
2 Tablespoons butter (salted or unsalted, doesn't matter)
2 Tablespoons sugar
1 teaspoon salt
1 egg, beaten
3 1/4 cups flour

Sprinkles:
1 cup sugar (next time I'm going to use ¼ cup sugar and ¾ cup brown sugar)
2 teaspoons cinnamon (next time I'll add 3 teaspoons)
¼ teaspoon nutmeg

Sauce:
¼ cup maple syrup
3/4 cup brown sugar
2 teaspoons cinnamon
½ cup melted butter (unsalted)
½ cup melted butter (salted)

Directions:
  1. Sprinkle the yeast onto the warm water. Give it a vigorous whisk, and allow to sit for about 5 minutes.
  2. To scald the milk: place milk in a reactive (a metal pan, rather than a nonstick one) saucepan on medium high.  Allow the milk to come to a full simmer.  When the milk starts to climb the sides of the pan, pull it off the heat.
  3. Add butter to the very hot milk.  Allow milk to cool for about 10 minutes. I usually put mine in the fridge to cool.
  4. Add the sugar and salt. Whisk around. Add in the egg and whisk thoroughly.
  5. Add ½ cup of the flour and stir completely.  Slowly pour in the milk, and stir. Mix in the remaining flour.
  6. Turn on your oven to 400℉.
  7. Knead the dough for roughly 5 minutes.
  8. Lightly spray a clean, large bundt cake pan with cooking spray.  Make sure to coat all the nooks and crannies.
  9. No, I did not let my dough proof in an oven. I was, however, busy making breakfast, so it probably sat on the counter for 14 minutes or so.
  10. Split the dough into small pieces. About 1 to 1 ½ inches square or so. No need to be exact. No need to roll them into balls. Just chop them roughly around that size.
  11. Mix your cinnamon sugar and nutmeg together in a medium sized bowl.
  12. Drop each of your small pieces of bread dough into the cinnamon sugar and toss them around, coating all the sides.
  13. Plunk the cinnamon sugar pieces into your bundt pan, placing them roughly fairly evenly around the inside of your dish.
  14. After each layer (or just every once in a while), sprinkle an additional handful of cinnamon sugar over the whole section of bread dough, just to give the dough even more of the cinnamon sugar goodness.
  15. Melt the butters together and stir to make sure the butter is completely melted. Add in the syrup, cinnamon, nutmeg, and brown sugar. Stir until it is a thick gooey delicious looking texture.
  16. Pour the cinnamon sugar syrupy caramel sauce over the top of the cinnamon bread chunks.
  17. Pop the bundt pan in the oven and bake for 30 minutes or so, or until the whole top is lovely and medium brown. After 24 minutes, keep an eye on it. This is rather tricky. You don't want the caramel to burn, but you don't want the bread to be under baked. So keep an eye on it.
  18. When the monkey bread is ready to come out of the oven, you're not going to let it rest in the pan it baked in. You're going to go ahead and pop it right out onto its plate.
  19. Get a cake plate or a wooden cutting board or a serving dish that is slightly larger than your bundt pan. Using hot pads, very carefully flip your bundt cake upside down (invert it), and lift off the pan. Fingers crossed, and the whole thing will pop out of your pan easily, the underside lovely and caramelized, and your kitchen smelling like heaven.
  20. Allow the monkey bread to cool slightly so that your fingers and your tongue do not suffer third degree burns when you dip in. If any of the caramel oozes off the sides, feel free to use a rubber spatula to schlop the goodness back onto the top of your bread.
  21. When the monkey bread comes out correctly, you should be able to dip your fingers inside and pull out lovely chunks of caramelized bread bits. Like bite sized sticky buns. And boy howdy, is it scrumpdillyicious!!

For those of you who like pictures, here you go:


At this point, the bundt pan was barely more than ½ full -- definitely not even 3/4 of the way filled, but I was all out of dough. I honestly thought there wouldn't be enough dough in the pan, and I regretted not making a second batch of dough. But honestly, it was more than plenty!!! The dough rose beautifully in the oven, and baked to perfection.


I thought it looked a wee bit too dark around the edges, but I'd only baked it for about 29 minutes at this point. But it was lovely. I think for me, it might have been better after 28 minutes. I wanted to make sure the insides were baked all the way through.

 Look at that lovely monkey bread!!! HEAVEN!


This is what my monkey bread looked like no more than 12 minutes later. We put the cutting board in the middle of the table, and each of us grabbed a fork. We sat on opposite sides of the table and systematically pulled little pieces off, put them onto our dessert plates, and nibbled. WOW. What a treat!

We obviously decimated the entire thing. My daughter claimed that this new treat was like eating the insides of cinnamon rolls -- all the nice and gooey parts, without the hard crusty outer pieces. My husband, in between happy mmms, said he'd like a wee bit more cinnamon. And when I mentioned that I have a recipe for a savory version of monkey bread, my son said he'd like to eat a garlic parmesan version of the bread. So, I'll definitely be making this again!!!

How might I improve the recipe for next time?

Next time I'm going to roll the pieces in brown sugar and cinnamon (rather than regular sugar and cinnamon), like I normally do when I make cinnamon rolls. I will also add more cinnamon. I may also add in some toasted pecans. And perhaps I'll try not using the maple syrup. I like my caramel sauce nice and sticky, and the maple syrup really did the trick. But when I make cinnamon rolls, I don't use maple syrup. I don't really need to, since the brown sugar and the butter melt together in a lovely way to create a caramel sauce. So, I'll give that a whirl and see if I can perfect the recipe. But honestly, this was pretty darned terrific. The whole thing was decimated in about 12 minutes. Clearly, we liked it!

Alrighty then, until next time!

I'm off to go work on Book 2.5, Jack and Claire's love story.

Who are Jack and Claire? Jack Diamond is a Detective for the Multnomah County Sheriff's Office, who stars as the protagonist in the Jack Diamond Murder Mystery series. Claire is a pediatric cosmetic surgeon who repairs birth defects and specializes in reconstruction after traumatic injuries. They fell in love in college. After years of separation due to work, marriage, murder and life, they finally find their way back to each other.

You can read all about them in Diamonds for Diamond and No One Noticed. They'll also both appear in Book 3 -- a yet to be named book about a massive casualty shooting on a pedestrian bridge in Portland, Oregon.

Click on the links below and get started. Amazon will ship them to you, or you can download and read the e-book versions now!

What are you waiting for? Go get the books now!

* * * * *

I not only bake and cook, I write murder mysteries too!

Both books are available in paperback and kindle versions

Diamonds for Diamond 
(Book 1 in the Jack Diamond Mystery series)
and
No One Noticed
(Book 2 in the Jack Diamond Mystery Series)


* * * * *

Monday, April 13, 2020

Granini's Au Gratin Potatoes

Granini's Au Gratin Potatoes
or as my favorite father-in-law calls them,
Baked cheesy goodness with some potatoes


Ingredients:
5 to 6 medium sized potatoes.
3 Tablespoons butter (salted or unsalted. Either works)
3 Tablespoons flour
3 cups ½ and ½ 
1 ½ cups sharp white cheddar cheese, grated
1 ½ cups sharp cheddar cheese, grated
1 to 2 teaspoons Lawry's Seasoned Salt
½ teaspoon smoked paprika (optional)
A nice sprinkle of regular paprika (optional)


*I typically use yellow potatoes, but red potatoes will work too. I'm not a big fan of using russet potatoes (baked potatoes) for any recipes except for baked potatoes and twice baked potatoes. But that's just me.

Directions:
1. Lightly spray a 9x13 or 8x11 glass baking dish with cooking spray. 

2. Preheat the oven to 350℉.

3. Fill a medium to large pot with hot water, sprinkle in some salt, and bring the water to a boil. While the water is heating up, start peeling your potatoes.

4. Peel all your potatoes.

5. Using a mandolin, thickly slice all your potatoes into evenly sliced pieces. If you don't have a mandoline, just do your very best to get the potatoes as evenly sliced as possible. 

My mandoline looks a bit like this. It is one of my newest, and most favorite, kitchen gadgets. Particularly when it comes to making au gratin potatoes.

6. Now. Here's a trick. When you're putting your potatoes into the boiling water, try to feed the potatoes into the water ONE AT A TIME, but do it quickly. One of the biggest hurdles with au gratin potatoes is having either potatoes that are underbaked and raw and nasty, or, having potatoes that are stuck to each other and thus not cooked properly and not coated with cheesy goodness. Boil the potatoes for about 8 to 10 minutes or so. It's more of a par boil than a true, boiled all-the-way-through kind of situation. You want them mostly boiled, but not so over boiled that they fall apart when you pour them into your baking dish. Once they're done boiling, drain them in a sieve and let them sit there and kinda hang out until your sauce is done.

7. While the potatoes are boiling, you can get your cheesy sauce going.

8. Grate all your cheeses and set aside.

9. In a large skillet with deep sides, melt your butter on medium to low heat. Turn the heat down to low and add your flour, and whisk together, allowing the flour and butter to cook together for a good 5 minutes or so. DO NOT cook the flour and butter on medium or high heat, or you may end up burning your flour and making the whole mess turn brown and taste nasty. Low to medium heat is the trick here.


10. Pour your half & half (you can use milk or cream, but I prefer half & half) into a small sauce pan and allow your cream to heat up a bit on medium to medium high. Don't allow it to boil.

11. Once your flour and butter mixture has cooked for several minutes, sprinkle on the Lawry's seasoned salt, and the (optional) smoked paprika. Then, slowly, a little at a time, pour in a little tiny bit of your heated half & half, using a whisk to bring the mixture together. Do not pour all of your half & half in all at once, or you risk the chance of getting lumps. Low heat, a little at a time. That's the trick here. Once all the half & half is mixed in, raise the temperature of the sauce to medium, or medium high. Bring the mixture to a slight boil, and then turn the sauce back down to low. Raising the temperature will allow the sauce to thicken up. Add in the cheeses, stir, and then turn off the heat.

12. Once the cheesy sauce is done, bring out your lightly sprayed baking dish. Ladle a layer of cheesy goodness onto the bottom of the baking dish. Then add a layer of your potatoes. I tend to slightly stir a wee bit, to try to make sure all the potatoes are covered in cheesy goodness. Ladle another spoonful of cheesy goodness over the top. Then add in another layer of potatoes. Repeat as necessary until all of the potatoes are covered in cheesy goodness. On the very top, sprinkle very lightly with paprika. Bake at 350℉ for about 40-45 minutes or so, or until the potatoes are bubbly and the cheesy mixture is browning lightly on the top.

I usually serve my au gratin potatoes with thick ham slices, deviled eggs, roasted asparagus or my green beans, and my glazed carrots.

Mmmmmmm.


* * * * *

I not only bake and cook, I write murder mysteries too!

Both books are available in paperback and kindle versions

Diamonds for Diamond 
(Book 1 in the Jack Diamond Mystery series)
and
No One Noticed
(Book 2 in the Jack Diamond Mystery Series)


* * * * *

Granini's Monkey Bread Failure

Granini's Monkey Bread Failure


Soooooooo....

I learned a lot about making Monkey Bread for the first time.

1. Do not use my homemade biscuit dough as a base for the monkey bread. Yes, my biscuits are amazing. But for monkey bread? I think I would prefer my dinner roll recipe as the base. (Here's why: My biscuit dough is flakey and crisp on the outside and soft and delicious on the inside normally, but in the failed monkey dough disaster experiment, they were mushy and mealy. Bleh.)

2. I baked my monkey bread per the directions off of several pinterest 'no fail' recipes, and baked them for 30 minutes. They were SOOOO underbaked. I baked them for another 10 minutes, and thought they looked okay. However, they were so not okay. They truly needed another 10 minutes. The insides were underbaked, but not raw. And the caramel sauce had not had a chance to quite set up like it should have.

And why, you ask, did I veer from the recipe that required biscuits in a can? Perhaps my monkey bread would have turned out had I done so. But I veered from the recipe because I never ever ever eat biscuits from a can. Nor do I eat bisquick biscuits. Which is a bit of an inside joke between my husband and I.

The idea of biscuits from a can seems unappetizing to me. I'm sure that if you're brought up with biscuits in a can they can be quite delicious. I have no problem whatsoever with packaged goods. I'm a glutton. I eat pop tarts and peanut butter captain crunch and a whole long list of other foods that are bad for me and are filled with preservatives and so forth. I am not a food snob. I use Lipton onion soup mix, Lawry's taco seasoning, and cream of mushroom soup on a regular basis. I'm also an enormous fan of Tostito's cheese dip -- a quicker and easier way to eat my childhood favorite Velveeta cheese dip  with Rotel tomatoes and chilis, green onions, and cilantro.

 But not once have I ever found the appeal of biscuits in a can. Probably because making biscuits from scratch is a relatively easy feat. Very difficult (for me) to screw up. Tasty and delicious. Flaky, buttery, soft, and oh so tasty. Sometimes when I eat processed food, all I can taste is the weird processed food bits. I can't taste the actual FOOD part. It's almost like eating something that's been served in a bowl that still has soapy water in it. You can taste the soapy water and can't really taste the actual food. When you're brought up with those tastes, they taste fine to you. You've acquired a taste for those extra flavors. But when you've been brought up on homemade biscuits or homemade pie dough it's a challenge to eat something out of a box. The difference between chocolate pudding out of a box and chocolate pudding from scratch is two completely different experiences. So yes, perhaps I am a selective food snob. Some foods just taste better to me when they're made from scratch. Others, I've grown accustomed to and like just fine. So eat the food that tastes good to you. And I'll do my best to help come up with recipes that are easy to follow, use only a handful of packaged ingredients (if any at all), and taste pretty terrific.

3. In the future, note to self, do NOT bake monkey bread on a top rack with cheesy au gratin potatoes directly below them. 
The monkey bread WILL drip over and down. 
And into your cheesy au gratin potatoes.
And all over the bottom of the oven.

UGH.

I was able to scoop the syrupy caramel sauce from the top of the potatoes and dump it out into the sink. I rearranged the items in the oven and placed them both on the top rack. The potatoes ended up turning out just fine. Whew. And the rest of the Easter brunch turned out just fine. But man, what a disappointment.

I don't often fail miserably when it comes to baking when I follow recipes. My greatest mishaps have always been when I try to create something on my own. But man alive, this was one truly disappointing disaster.

Tune in next week when I try them again. Using my Parker House dinner roll recipe.

If they don't turn out, I'll just go back to making my cinnamon rolls
They're amazing.

* * * * *

I not only bake and cook, I write murder mysteries too!

Both books are available in paperback and kindle versions

Diamonds for Diamond 
(Book 1 in the Jack Diamond Mystery series)
and
No One Noticed
(Book 2 in the Jack Diamond Mystery Series)


* * * * *

Friday, June 10, 2016

Granini's Biscuits and Gravy


GranNini's Biscuits and Gravy

Ingredients:

1 package sausage *
1 Tablespoon margarine (you will need more later)
1 package Lipton onion soup mix
2 cups hot water
3 Tablespoons margarine
3 Tablespoons flour
1 cup milk
1 to 1 1/2 cups sharp cheddar cheese, shredded
Dash of Lawry's Seasoned Salt

(*I use Isernio's Breakfast Chicken Sausage, but feel free to use pork sausage if you prefer)


Directions:

  1. In a bowl or glass measuring cup, mix Lipton onion soup mix with 2 cups of hot water.  Set aside.
  2. Shred the sharp cheddar cheese and set aside.  I can't buy pre-shredded cheese.  It gives me the heeby-jeebies.  Don't know why, but it does.  I also never measure my cheese with a measuring cup.  I simply eyeball what I need.  I probably use even more than a cup -- a large handful or so seems to be just about enough.
  3. In a large skillet, melt 1 Tablespoon of margarine.  Add in the chicken sausage, and brown the chicken sausage completely.  Make sure to break up the pieces of sausage into small, bite sized pieces while browning.  Drain, and set aside in a small bowl.
  4. Add margarine to the skillet.  Over medium low heat, melt margarine.  Sprinkle flour over the top, and whisk together, allowing the mixture to heat up for several minutes, stirring constantly.
  5. Slowly whisk in the Liption onion soup water mixture, a little at a time, to avoid making lumps.  
  6. Slowly whisk in milk.
  7. Allow the mixture to come to a full simmer, stirring constantly.  If the mixture is still too thick, add in more milk as necessary to reach the desired consistency.  Some people prefer a thinner sausage gravy.
  8. Gently add in the sausage, and stir for a minute or so.
  9. Sprinkle on the cheddar cheese, and stir until thoroughly integrated.  
  10. Sprinkle on a dash of Lawry's seasoned salt.  Again, I don't measure, I just eyeball it.  Probably about 1 teaspoon worth.  Again, you will need to season your gravy to your tastes.  I prefer a saltier, more flavorful sausage gravy than what you might find at oh, say, a breakfast restaurant.  But the soup mix adds in a LOT of salt all on its own.  
  11. Ladle your gravy over piping hot biscuits and serve!  
For those of you who need the biscuits recipe, click here.

Mmmmm.  Biscuits and gravy!!

For those of you who like pictures, here you go!

Melt a little bit of margarine, then add in your sausage.
I use chicken sausage.  I have a favorite brand, which is very flavorful, and tastes delicious.  Next time I'll try to remember to take a picture of the package.  But you can use pork sausage just as easily.


Brown your sausage completely.  Then remove from the pan.

 Add in the flour, and whisk together over medium low heat.  Too hot, and you'll get lumps.  And who wants lumps?!?

 Slowly add in the soup mix to form a roux.  Stir together thoroughly and let cook a bit to get rid of the 'floury' taste.

Slowly stir in the milk, and allow the mixture to simmer.  Mmmm. Smells good already!


Add the sausage back in.  Then stir it all together.


Oh, my!  Smell that goodness!

Sprinkle on the sharp cheddar cheese and some Lawry's seasoned salt.

Now that's good gravy!

Serve it up with some super cheesy scrambled eggs on top of piping hot biscuits, and that's a mighty fine breakfast you have!!  

If you need the biscuits recipe, click here.

Enjoy!


* * * * *

I not only bake and cook, I write murder mysteries too!

Both books are available in paperback and kindle versions

Diamonds for Diamond 
(Book 1 in the Jack Diamond Mystery series)
and
No One Noticed
(Book 2 in the Jack Diamond Mystery Series)


* * * * *